Widgets → Tabs
 This widget allows you to easily group other widgets into tabs.
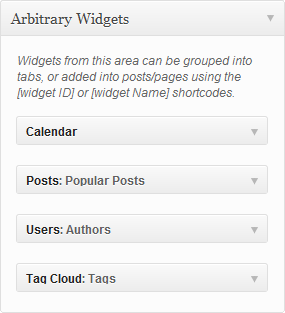
To use it, first drop the widgets you want into the “Arbitrary Widgets” area, and configure them as you wish.
Keep in mind that this is an active area, just like the sidebars. Cluttering it with many widgets will cause your site to run slowly – only add the widgets you need.
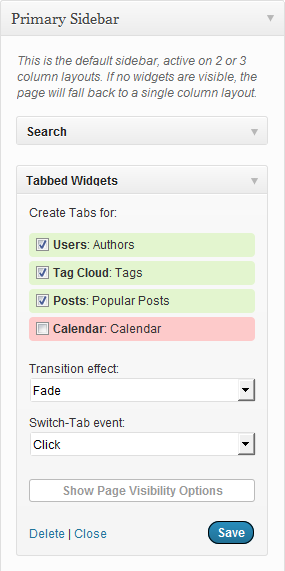
 Next, drop a “Tabbed Widgets” widget inside a sidebar or any other area where you want display the tabs.
Then configure it, by selecting the arbitrary widgets you want to group in tabs. You can refresh the widget list by clicking the “Save” button (in case you add more arbitrary widgets in the meantime), or re-order the list by dragging them with the mouse.
Customizing the Tabs
Atom themes will style most of their widgets, but they can’t handle 3rd party plugin widgets too, because there are thousands of them out there ![]()
The type of customization also depends on the theme, however in most cases you will only need to add a tab icon for a certain widget. This is done trough CSS quite easily, here’s example:
- This widget is going to be our test case.
- Design your icon (or find one on the web), and upload it somewhere on your server. I’ll choose here a 24×24 Twitter image from “Fast Icon” as an example:
The best place to upload it is the child theme’s “/images” directory, for example:
wp-content/themes/mystique-extend/images/Do NOT upload it in the parent theme directory, because it will get removed when you update!
- Go to your theme settings, click on the CSS tab and add the relevant CSS code:
/* My Twitter Widget icon */
.block-tabs .tabs .navi li.nav-twitter-widget a{
  background: transparent url("{CHILD_THEME_URL}/images/Twitter-icon.png") no-repeat center center;
}
The {CHILD_THEME_URL} is an Atom keyword and will automatically point to the directory above. If you want to use your own URL, make sure the path is absolute, not relative.
The .nav-twitter-widget class represents the widget class name.
- That’s it! This is what we get in the Mystique theme:

There are plans to automate the upload / CSS styling process in future Atom versions, but this is not a high priority at the moment.